Migrating an engineering firm’s data to SharePoint becomes a structured and manageable process when supported by the right strategy, even with complex CAD assemblies, BIM models, and large technical files. However, with a structured, expert-led methodology, the process becomes predictable, efficient, and fully controllable.
By following this roadmap, IT managers, project leads, and document controllers can preserve metadata, maintain permissions, safeguard version histories, and ensure CAD assemblies remain fully functional. This guide is designed to mitigate typical migration anxieties while providing step-by-step actionable instructions of SharePoint engineering for firms.

Phase 1: The Pre-Migration Audit & Inventory
A thorough pre-migration audit is the foundation of a successful migration. It ensures all critical data is identified, organized, and ready for a smooth transition, reducing downtime and preserving project continuity.
Step-by-Step Checklist
- Identify All Data Sources
- Catalog all repositories: file shares, legacy PDM/PLM systems, archived folders, cloud storage, and project-specific storage.
- Include CAD libraries, BIM models, and technical documentation. These files are often large and interdependent, requiring careful planning.
- Document special permissions and access rules to ensure all user access is preserved in SharePoint.
- Run Source Analysis
- Analyze each data source for file types, sizes, last-modified dates, and version histories.
- Identify duplicates, incomplete assemblies, obsolete documents, and legacy files.
- Flag large binaries (>2GB) or linked CAD files for specialized handling and migration planning.
- Evaluate Version Histories
- Determine which versions are essential for ongoing projects.
- For legacy PDM systems, verify check-in/check-out histories and revisions to ensure continuity.
- Maintaining version history is crucial for audits, project traceability, and collaboration.
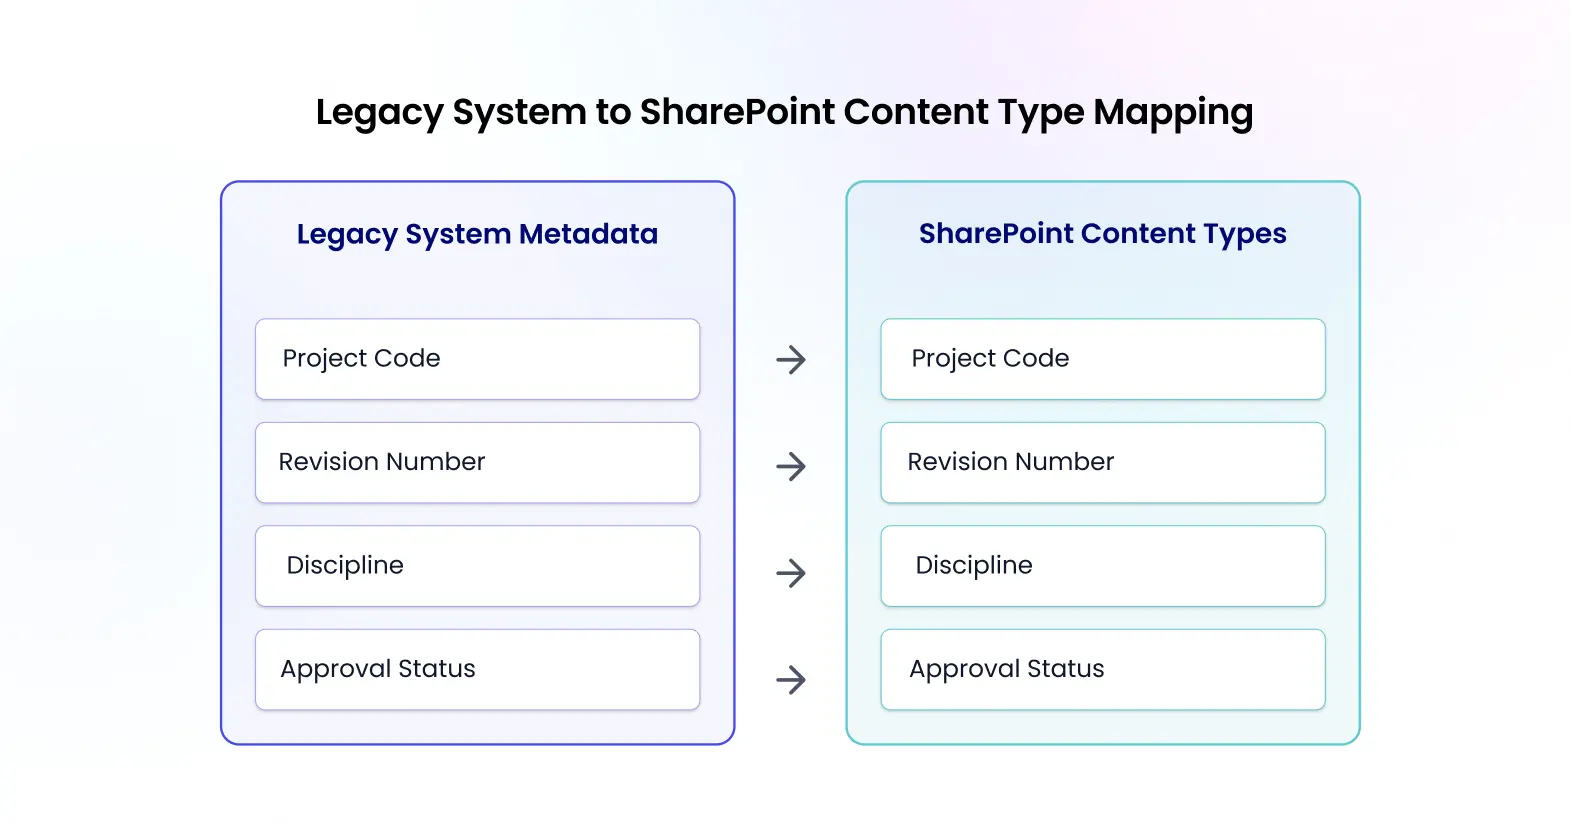
- Detect Metadata Dependencies
- Audit project-specific metadata such as project codes, disciplines, approval status, and author info.
- Mapping this metadata ensures files remain searchable, well-organized, and fully functional in SharePoint.
- Consider legacy naming conventions and how they will translate into SharePoint’s managed metadata system.
- Review Permissions Structures
- Export folder and file-level permissions to document who can access what.
- Identify nested groups, exceptions, and external collaborators.
- Plan a strategy to replicate or optimize these permissions in SharePoint, maintaining secure and manageable access controls.
- Identify Active Workflows
- Capture existing automated approvals, notifications, and other workflows tied to documents.
- Evaluate if workflows are project-critical or can be re-engineered within SharePoint. Many legacy approval processes benefit from modernization during migration. For a deeper look at automation strategies, see our SharePoint Workflows Development guide.
- Proper planning ensures workflows remain operational post-migration, minimizing project disruption.
- Select Migration Tools
- Choose tools that support metadata preservation, permission mapping, and large file handling, such as ShareGate, AvePoint, or Metalogix. Budget planning and licensing considerations are equally important during this phase. For a detailed breakdown of costs and planning considerations, see our SharePoint Migration Cost Guide.
- Run a pilot migration to validate tool performance, ensuring a reliable migration framework before executing the full process.
Phase 2: Mapping Metadata & Permissions
Preserving metadata and permissions ensures files retain their context, integrity, and usability. Proper mapping enhances searchability, compliance, and project collaboration.
 Checklist: Metadata Preservation Strategy
- Audit Existing Metadata
- Document all fields, including custom CAD/BIM properties and approval workflows.
- Identify critical elements such as project codes, revision numbers, file type, discipline, and approval status.
- Validate if legacy systems store metadata in external files or embedded within CAD/BIM models.
- Design Target Content Types
- Map legacy metadata to SharePoint content types and site columns for consistency.
- Apply managed metadata for fields used across multiple projects to maintain uniformity and improve search functionality.
- Create a taxonomy for project types, file categories, and document statuses to streamline organization. A well-structured document framework improves long-term usability and compliance. Explore our SharePoint Document Management System guide to see how metadata, versioning, and permissions work together in a properly designed environment.
- Create a Mapping Document
- Maintain a spreadsheet linking source fields to SharePoint columns.
- Include notes for multi-valued fields and properties without direct equivalents, ensuring no metadata is lost during migration.
- Reference legacy file naming patterns to maintain continuity for existing users.
- Select a Metadata-Compatible Tool
- Ensure your migration tool fully supports metadata mapping, especially for large CAD files.
- Pilot migration validates that all fields transfer correctly, reducing post-migration troubleshooting.
- Validate Mapping on a Pilot Dataset
- Test with critical CAD assemblies, BIM models, and technical documentation.
- Confirm project codes, revisions, and metadata fields are accurately preserved and searchable in SharePoint.
Checklist: Permissions Mapping Strategy
- Document Current Access Rights
- Export permissions for internal teams, contractors, and external collaborators.
- Map special access rules for sensitive projects or confidential designs.
- Design SharePoint Security Groups
- Map legacy teams to SharePoint groups with appropriate read, edit, or full control permissions.
- Apply inheritance rules where possible to simplify ongoing management.
- Plan for Exceptions
- Identify folders with unique or restricted access.
- Ensure these exceptions are replicated accurately in SharePoint to maintain security and compliance.
- Test Permissions During Pilot Migration
- Validate access for all groups, including external partners.
- Confirm inheritance rules and sensitive folders are correctly secured.
- Document Governance Model
- Define rules for ongoing permission management, auditing, and onboarding.
- Establish review cycles to ensure access remains up-to-date and secure.
Phase 3: Handling Large Binaries & CAD Files
Large engineering files, particularly CAD assemblies and BIM models, present unique migration challenges due to their size, interdependencies, and embedded metadata. Careful file management safeguards external references, keeps project workflows running seamlessly, and maintains a complete and reliable version history. A carefully planned approach ensures files remain fully functional, searchable, and compliant after migration.
-
Identify Files with External References (Xrefs)
- Flag CAD assemblies that reference parts across multiple directories or linked libraries. These Xrefs are critical for assembly integrity.
- Include BIM models and multidisciplinary project files that reference external sources to prevent broken links.
- Review older CAD versions and legacy project folders to ensure no external dependencies are overlooked.
- Maintain a mapping of all linked files to ensure migration tools can replicate the relationships accurately in SharePoint.
-
Create Dedicated Libraries
- Store large CAD/BIM files in separate, optimized libraries within SharePoint to prevent performance issues.
- Use project-specific metadata such as discipline, project code, revision, status, and client to improve organization and searchability.
- Implement folder and library structures that mirror your PDM system, while considering SharePoint best practices for content types and managed metadata.
- Libraries can also be permission-controlled independently to minimize exposure of sensitive projects.
-
Maintain Link Integrity
- Use migration tools capable of preserving Xrefs and linked parts without flattening assemblies. Maintaining structured file naming preserves assembly relationships and ensures seamless integration across projects.
- Avoid reorganizing source directories during migration; maintain folder paths where feasible.
- Test sample assemblies in SharePoint after migration to ensure all external references resolve correctly.
- Communicate to engineering teams about any naming conventions or structural changes applied during migration to reduce confusion.
-
Versioning Strategy
- Apply check-in/check-out policies to preserve project context and revision history.
- Ensure all major and minor versions from legacy systems are migrated to SharePoint to maintain auditability and traceability.
- Use version-controlled libraries for critical design documents and CAD models. This supports collaboration without overwriting existing work.
- Document any exceptions where version history cannot be fully preserved and plan for manual reconciliation.
-
Performance Considerations
- Evaluate network bandwidth and storage allocation before migrating large binaries.
- Consider chunked uploads or incremental migration for very large files to reduce transfer errors.
- Schedule migrations during off-peak hours or weekends to avoid disruption to ongoing projects.
- Monitor tool performance and error logs continuously during migration, adjusting batch sizes or library structures as needed. Here’s how to manage CAD files in SharePoint.
Phase 4: Pilot Migration & Downtime Minimization
Pilot migration is a critical validation step. It allows teams to test processes, confirm metadata and permissions, and uncover hidden dependencies before executing the full migration.
-
Select Representative Data
- Include a mix of CAD/BIM assemblies, large binaries, technical documents, and metadata-heavy files.
- Ensure the dataset covers files with external references, complex permissions, and unique workflows.
- Include projects from multiple departments to detect any interdepartmental dependency issues early.
-
Perform Bulk Migration
- Execute the migration during off-peak hours or weekends to minimize business disruption.
- Track migration logs in real-time to detect failed transfers or permission mismatches.
- Document any errors to adjust migration strategies for the full rollout.
-
Incremental/Differential Sync
- After bulk migration, migrate only changed or newly created files to reflect current project data.
- This ensures the final cutover includes the latest versions and prevents data loss.
- Schedule incremental syncs for multiple iterations if necessary to reduce cutover downtime.
-
Validate Metadata and Permissions
- Test that all content types, site columns, and metadata fields are preserved and applied correctly.
- Confirm security groups and permissions align with the intended governance model.
- Test project-specific searches and filters to ensure critical files remain easy to find.
-
Collect Feedback and Refine Plan
- Review pilot results with IT, engineering leads, and document controllers.
- Adjust mappings, folder structures, or permissions based on feedback.
- Prepare contingency plans for unforeseen challenges during the full migration.
Phase 5: Go-Live & Post-Migration Validation
Go-live is the final confirmation of planning and execution. Following these steps ensures a smooth transition with minimal risk.
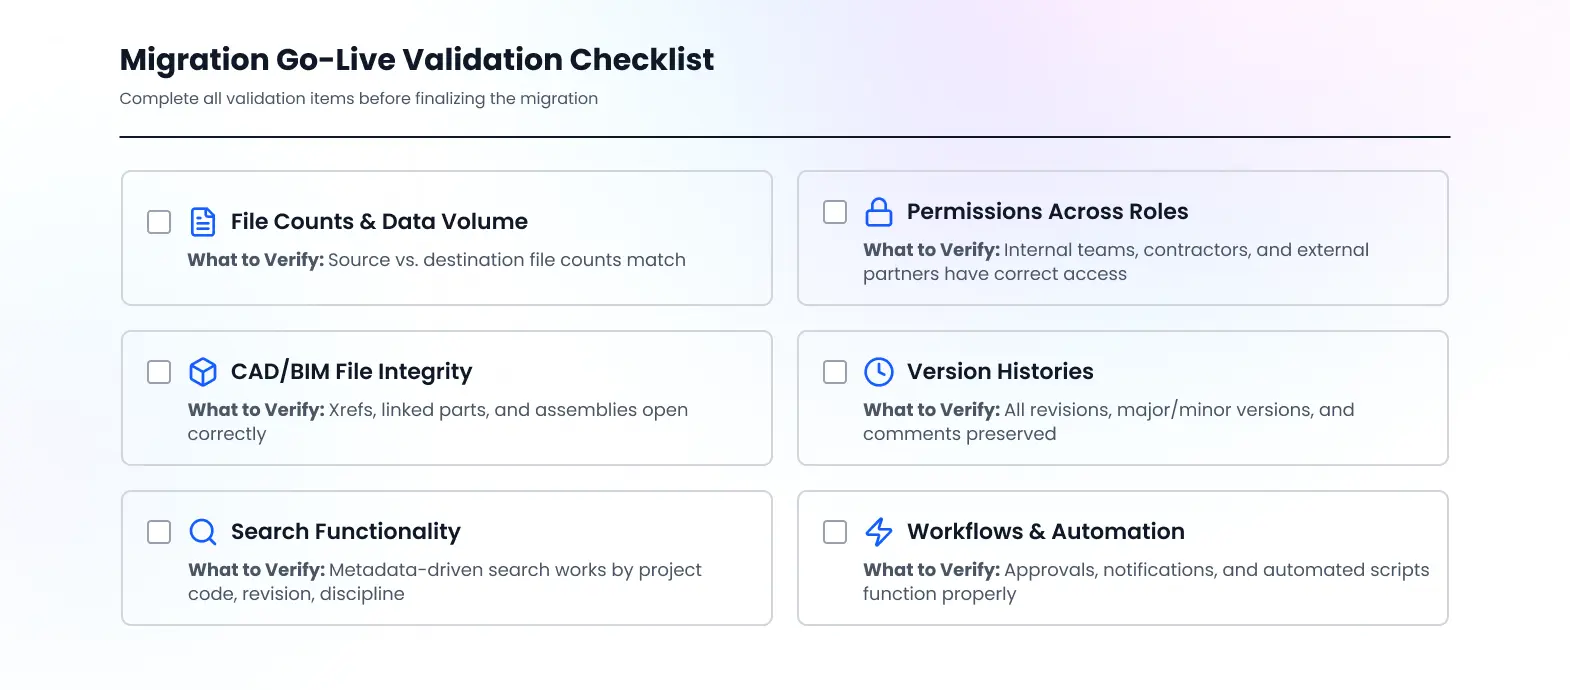 Checklist: Post-Migration Validation
- Verify File Counts & Data Volume
- Compare source and destination file counts and sizes to confirm completeness.
- Use automated tools where possible to ensure no files are missed or corrupted.
- Test Permissions Across Roles
- Validate that internal teams, contractors, and external partners have appropriate access.
- Check nested permissions, inherited folders, and exceptions to ensure security is preserved.
- Open Sample CAD/BIM Files
- Confirm Xrefs, linked parts, and assembly integrity.
- Test multiple project types and cross-referenced files to detect any broken links.
- Check Version Histories
- Ensure all historical revisions, major/minor versions, and comments are preserved.
- Confirm check-in/check-out functionality works seamlessly in SharePoint.
- Test Search Functionality
- Validate metadata-driven search by project code, revision number, or discipline.
- Ensure that critical design files are quickly discoverable for ongoing projects.
- Audit Workflows
- Confirm automated approvals, notifications, and scripts tied to documents are functioning.
- Adjust workflows where needed to accommodate SharePoint-specific triggers or settings.
- Document Findings
- Log missing files, broken links, or permission issues.
- Assign team members responsible for resolving discrepancies promptly.
- Use reporting dashboards to track issue resolution and compliance.
Frequently Asked Questions
How do we preserve CAD file links and external references (Xrefs) during migration?
Using tools like ShareGate or AvePoint ensures all links remain functional. Dedicated libraries, correct folder structures, and proper metadata tagging guarantee assemblies stay intact. Pilot testing Xrefs confirms link integrity, giving teams confidence that projects remain fully operational.
What’s the best way to handle permissions for teams with different access levels?
Audit current permissions, map users to SharePoint groups, and apply inheritance rules. Testing during pilot migration ensures access is accurate and secure. Nested groups simplify ongoing management and guarantee consistent, safe access for all stakeholders.
How do we prevent metadata loss during migration?
Audit all metadata, map to SharePoint content types, and test a pilot dataset. Use tools that preserve metadata, ensuring project codes, revisions, and custom fields remain intact. This step guarantees searchability, organization, and compliance.
How much downtime should we expect during cutover?
Downtime is minimized through bulk migration and incremental syncs. Pilot migration helps predict timing, and final cutover scheduled during off-peak hours ensures smooth, uninterrupted project workflows.
What should we do immediately after migration to ensure everything worked?
Ensuring all file counts and permissions are accurate, critical files remain fully accessible, version histories are intact, search performs flawlessly, and workflows operate seamlessly and support efficient and reliable project management. Document findings and coordinate any necessary enhancements to maintain optimal performance. Following this checklist ensures full operational confidence post-migration.
Conclusion: Your Blueprint for a Flawless Engineering Migration
A successful SharePoint migration for engineering firms is powered by strategic planning, precise metadata alignment, well-structured permissions, and thorough validation, ensuring smooth, reliable, and efficient operations. By following this expert-led checklist, CAD assemblies, BIM models, and technical documents remain secure, fully functional, and easily accessible. Partner with a specialist for your engineering migration to achieve a seamless, confident transition.