
Engineering projects in the AEC (Architecture, Engineering, and Construction) world live and breathe through their CAD files. From DWG drawings to Revit and BIM models, every design decision, approval, and milestone depends on how well that data is managed. When CAD files are well-organized and structured, teams can access designs efficiently, maintain accurate revisions, and work with greater confidence in the system.
The good news? SharePoint Engineering Solutions give you a clear path from chaos to control. With the right configuration, SharePoint Online becomes far more than a storage tool. It turns into a powerful platform for AutoCAD, Revit, and BIM. It supports version control, metadata-driven organization, and workflow automation so your team can work faster, safer, and with confidence.
By the end of this guide, you’ll know exactly how to turn SharePoint into a high-performance CAD platform your engineers trust.
The Unique Challenges of CAD File Management in SharePoint
CAD files behave very differently from office documents. They are large, interdependent, and sensitive to path changes. A standard SharePoint Document Library doesn’t handle CAD file behaviors automatically, but proper setup can make it work efficiently.
Focusing on three key challenge areas can help teams work more efficiently, prevent errors, and maintain data integrity.
1. Managing Files Without Native Locking
While SharePoint doesn’t track editing behavior for DWG, RVT, or BIM files by default, teams can collaborate effectively using versioning and workflow controls, ensuring all changes are preserved and work stays coordinated. Implementing workflows and versioning helps maintain data integrity and ensures work is preserved.
2. Maintaining Stability of Xrefs and Data Shortcuts
AutoCAD and Revit rely on linked files. These links depend on consistent file paths. Xrefs may fail if files are moved via the SharePoint web interface or stored in deep folder structures, but proper file management can prevent these issues. Addressing this common issue is key to ensuring smooth CAD workflows in SharePoint.
3. Managing Large Files and Long URL Paths
BIM models are large and complex. SharePoint supports large files, but performance degrades when:
- Excessively long file paths
- Folder structures are deep
- URLs exceed the 400-character path limit
Without proper management, files may experience sync issues or limited access, which can be easily prevented with the right controls.
These are not platform bugs. They are design issues. The solution is a SharePoint configuration built specifically for engineering workflows.
Best Practice 1: Mastering Versioning and Check-In/Check-Out
Version control and file locking are the foundation of a SharePoint CAD system your engineers can trust. Without them, DWG files get overwritten, Revit models drift out of sync, and valuable work disappears. When versioning and check-in/check-out are configured correctly, your team gains confidence that every change is protected, every edit is traceable, and collaboration happens without fear of losing work.
Configuring Version History for CAD Libraries
Every CAD Document Library in SharePoint should be configured to support major and minor versioning. Major versions represent approved or released files, while minor versions capture ongoing edits or drafts. Follow these steps to set up version history:
- Open your CAD library in SharePoint Online.
- Navigate to Library Settings.
- Click on Versioning Settings.
- Enable Create major and minor (draft) versions.
- Require content approval for major versions.
- Set Draft Item Security to allow only users with approval permissions to view draft versions.
- Define retention policies if needed to automatically archive older revisions or limit the number of draft versions per file.
This configuration allows engineers to work on draft files safely, while only approved files are promoted to major versions. Every change is tracked in the version history, providing a complete audit trail.
Enforcing Check-In/Check-Out for File Locking
SharePoint does not provide native CAD file locking, which can result in multiple engineers editing the same file simultaneously. Enforcing check-in/check-out ensures only one user can make changes at a time, preventing conflicts and preserving the integrity of DWG, Revit, and BIM files. The recommended workflow is:
- Check out the CAD file from the SharePoint library.
- Make edits in AutoCAD, Revit, or BIM software.
- Save changes locally to ensure the file remains in sync with SharePoint.
- Check the file back in, including a comment describing the revisions made.
This workflow guarantees that all changes are logged in version history, prevents accidental overwrites, and enables multiple engineers to collaborate without conflicts.
Best Practice 2: The Metadata Strategy
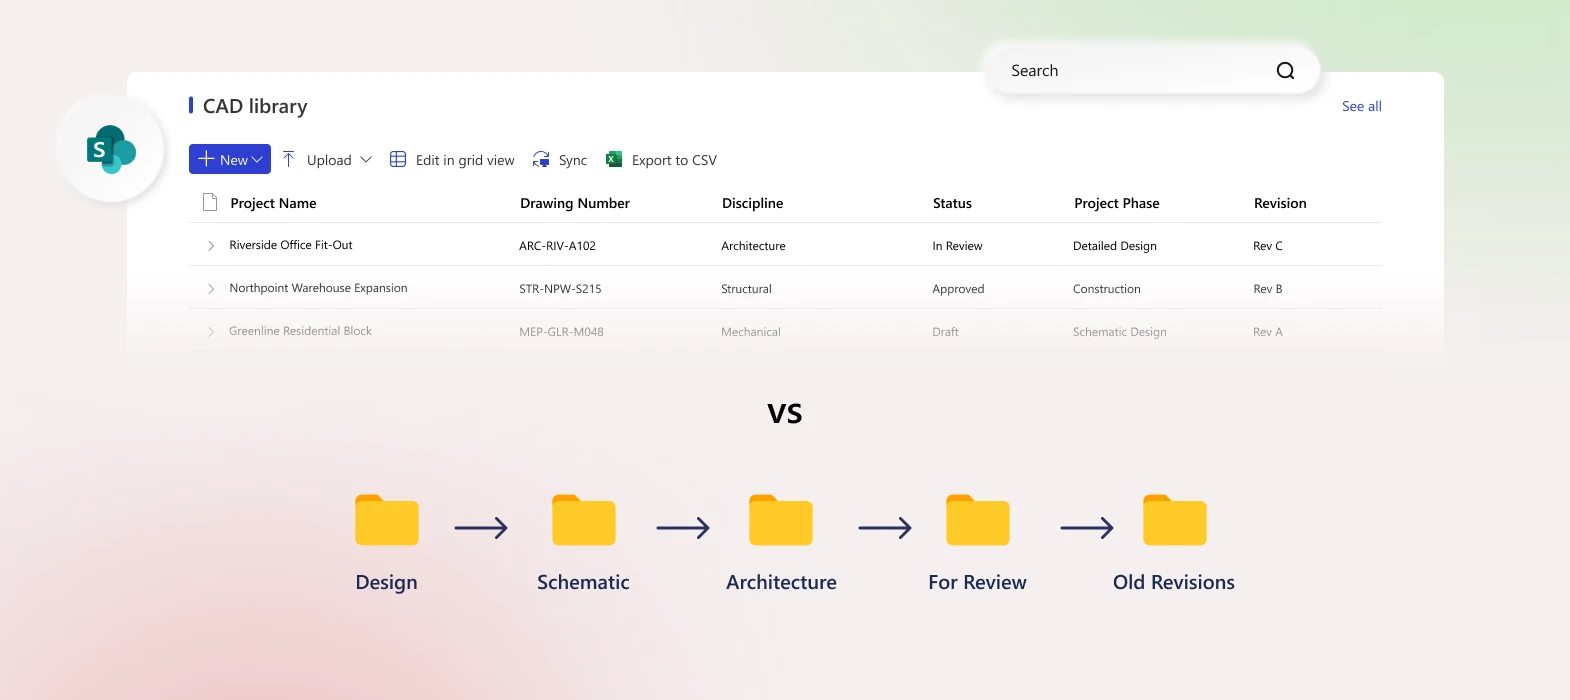
Imagine finding any drawing, for any project, in seconds without clicking through seven levels of folders. That’s the power of a metadata-driven CAD strategy in SharePoint. Instead of burying files in deep structures that break Xrefs and slow your team down, metadata gives you speed, clarity, and control across every project.
Essential CAD Metadata Tags
A powerful and efficient CAD library is built on standardized metadata columns that capture the critical attributes of each file. Recommended tags include:
- Project Name: Identifies the project or client associated with the file.
- Drawing Number: Unique identifier for each DWG or Revit file.
- Revision: Tracks the version or revision of the file, matching the versioning system.
- Status: Indicates whether the file is Draft, In Review, or Final.
- Discipline: Civil, Structural, MEP, or Architectural classification.
- File Type: DWG, RVT, IFC, PDF, or other relevant formats.
- Project Phase: Concept, Design, Construction, or As-Built stage.
Using these columns allows engineers and project managers to locate files quickly, generate reports, and automate workflows without digging through folders. More importantly, a metadata-driven strategy reduces rework, shortens search time, and lowers the Total Cost of Ownership (TCO) of your SharePoint CAD environment by cutting the hidden costs of lost time, broken links, and duplicated effort.
Leveraging the Term Store for Consistency
To enforce consistent metadata values across all projects, the Managed Metadata Service and Term Store in SharePoint Online should be used. The Term Store allows administrators to define controlled vocabulary for key fields such as Project Name, Discipline, Status, and Project Phase.
Implementation steps:
- Access the SharePoint Admin Center and navigate to Term Store Management.
- Create a Term Set for each key metadata column (e.g., Project Name, Status).
- Add standardized terms to each Term Set and configure synonyms if needed.
- Link the Term Sets to the corresponding columns in your CAD libraries.
By doing this, all engineers select metadata from a controlled list instead of entering free-text values, eliminating inconsistencies, typos, and duplicate entries.
Best Practice 3: Overcoming Technical Limitations
CAD file management in SharePoint presents unique technical challenges, particularly when working with External References (Xrefs), data shortcuts, large files, and long URL paths. Improper handling of these issues can result in broken links, sync errors, or slow performance.
Managing External References (Xrefs) and Data Shortcuts
External References, or Xrefs, are critical for CAD collaboration but are highly sensitive to file paths. Moving files, renaming folders, or using deep SharePoint structures often breaks these links. The most effective approach combines relative paths, consistent folder structure, OneDrive sync, and specialized tools like the Autodesk Desktop Connector for complex SharePoint or BIM 360 environments.
Use relative paths in CAD software
Configure AutoCAD and Revit to reference Xrefs and data shortcuts using relative paths rather than absolute paths. For example, instead of C:\Users\Engineer\Projects\ProjectA\Xrefs\Site.dwg, use ..\Xrefs\Site.dwg. Relative paths remain valid even if the library is synced across multiple devices.
Sync SharePoint libraries with OneDrive
Engineers should work from locally synced SharePoint libraries via OneDrive. Open the CAD library in SharePoint Online, click Sync, and edit files directly from the synced folder. This allows AutoCAD and Revit to resolve paths as if they are working on a local network, preventing broken Xrefs caused by direct web access.
Standardize folder structure across projects
Maintain a consistent folder hierarchy in every project library. Recommended structure:
- 01_Model – native CAD/BIM files
- 02_Xrefs – referenced drawings or external data
- 03_Sheets – plotting or sheet files
- 04_Deliverables – PDFs or exported files
Consistency ensures that Xrefs remain intact across all projects and team members. Avoid moving linked files in the SharePoint web interface once Xrefs are established.
This workflow maintains data integrity, prevents broken references, and supports seamless collaboration in engineering document control.
Addressing Large File Sizes and URL Path Limits
SharePoint Online supports large files, but performance and stability depend on proper file management. Large DWG, RVT, or BIM files can slow sync, exceed SharePoint limits, or fail if file paths are too long. Follow these best practices:
- Limit file and folder name lengths
Keep names concise, ideally under 50 characters per file or folder. Combine metadata tags instead of long descriptive names. - Minimize folder depth
Avoid creating deep hierarchies. Each additional folder increases the URL length, which can lead to errors if it approaches the 400-character limit. Use metadata and filters instead of nested folders to organize files. - Split large datasets where possible
For massive Revit or BIM files, consider breaking projects into logical sub-models or linked files. This reduces load time and improves syncing performance. - Monitor sync and performance regularly
Use OneDrive sync logs and SharePoint usage reports to detect large files or long paths. Adjust the library structure before issues propagate.
By applying these techniques, engineers can maintain SharePoint for CAD drawings that are performant, reliable, and fully functional, even for complex projects with multiple Xrefs, large models, and extensive collaboration.
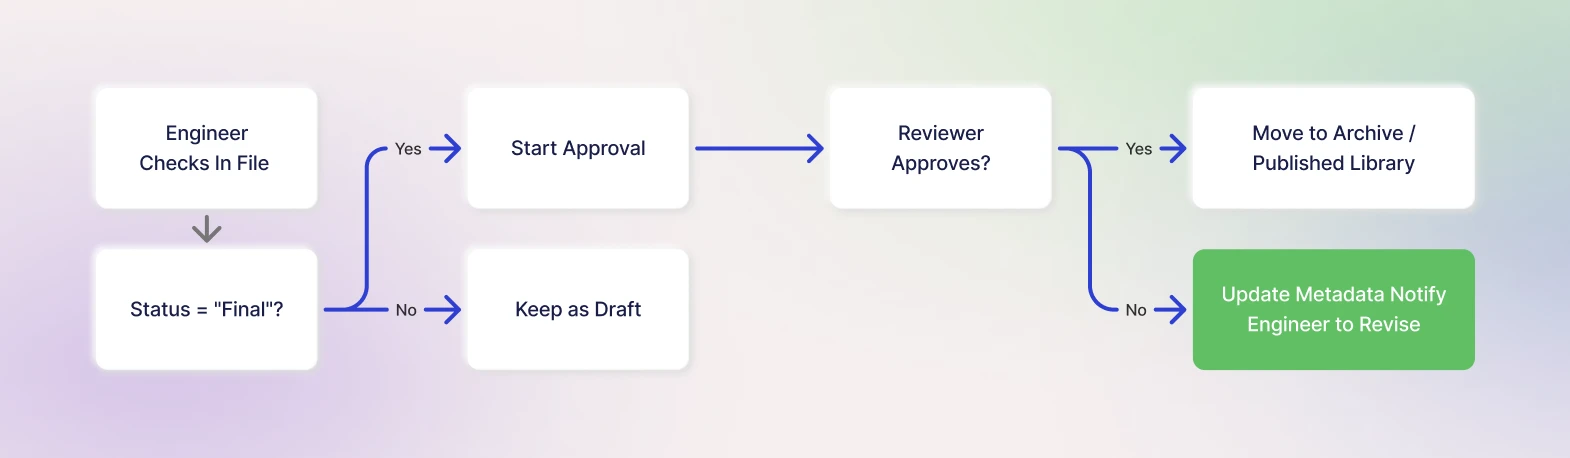
Best Practice 4: Automating CAD Workflows and Approvals
Manual management of CAD files slows projects and increases errors. Using Power Automate with SharePoint Online allows engineering teams to enforce workflows, maintain control, and streamline collaboration. Automation ensures that every DWG, Revit, or BIM file follows the correct lifecycle without manual oversight.
Using Power Automate for Lifecycle Management
Power Automate can handle key stages of CAD file management:
- Notifications on check-in – Stakeholders receive automatic alerts when a file is checked in, keeping teams up to date.
- Approval routing – When the Status changes to “Final,” files are automatically routed for review and approval, updating metadata once approved.
- Archiving – Superseded files can be moved automatically to an archive library, keeping active libraries clean.
- Metadata enforcement – Workflows can ensure all required metadata is filled before files are published or released.
With the right automation in place, SharePoint stops being a passive file store and becomes an active CAD control system. Approvals move faster, mistakes drop, and engineers spend less time chasing files and more time delivering projects. That’s the real value of workflow-driven CAD management.
Ready to Implement Your Best Practice Workflow?
Managing CAD files in SharePoint goes far beyond simple storage. It involves smart versioning, controlled check-in and check-out, metadata-driven organization, Xref handling, and automated workflows that guide files through review and approval. These practices help teams avoid rework, reduce errors, and protect data quality when choosing the right engineering document management system for complex design environments.
When SharePoint is custom-configured for engineering use, it becomes more than a file library. It turns into a full CAD document management system that supports AutoCAD, Revit, and BIM models across disciplines. For teams comparing PDM alternatives, this approach offers strong version control, clear ownership, and visibility across the entire project lifecycle.
Ready to transform your SharePoint environment into a high-performance CAD platform? Explore our Custom Engineering Solutions to see how we can help you implement these best practices.